Call of Duty: Modern Warfare II Season 05 — Punta Mar Map Intel
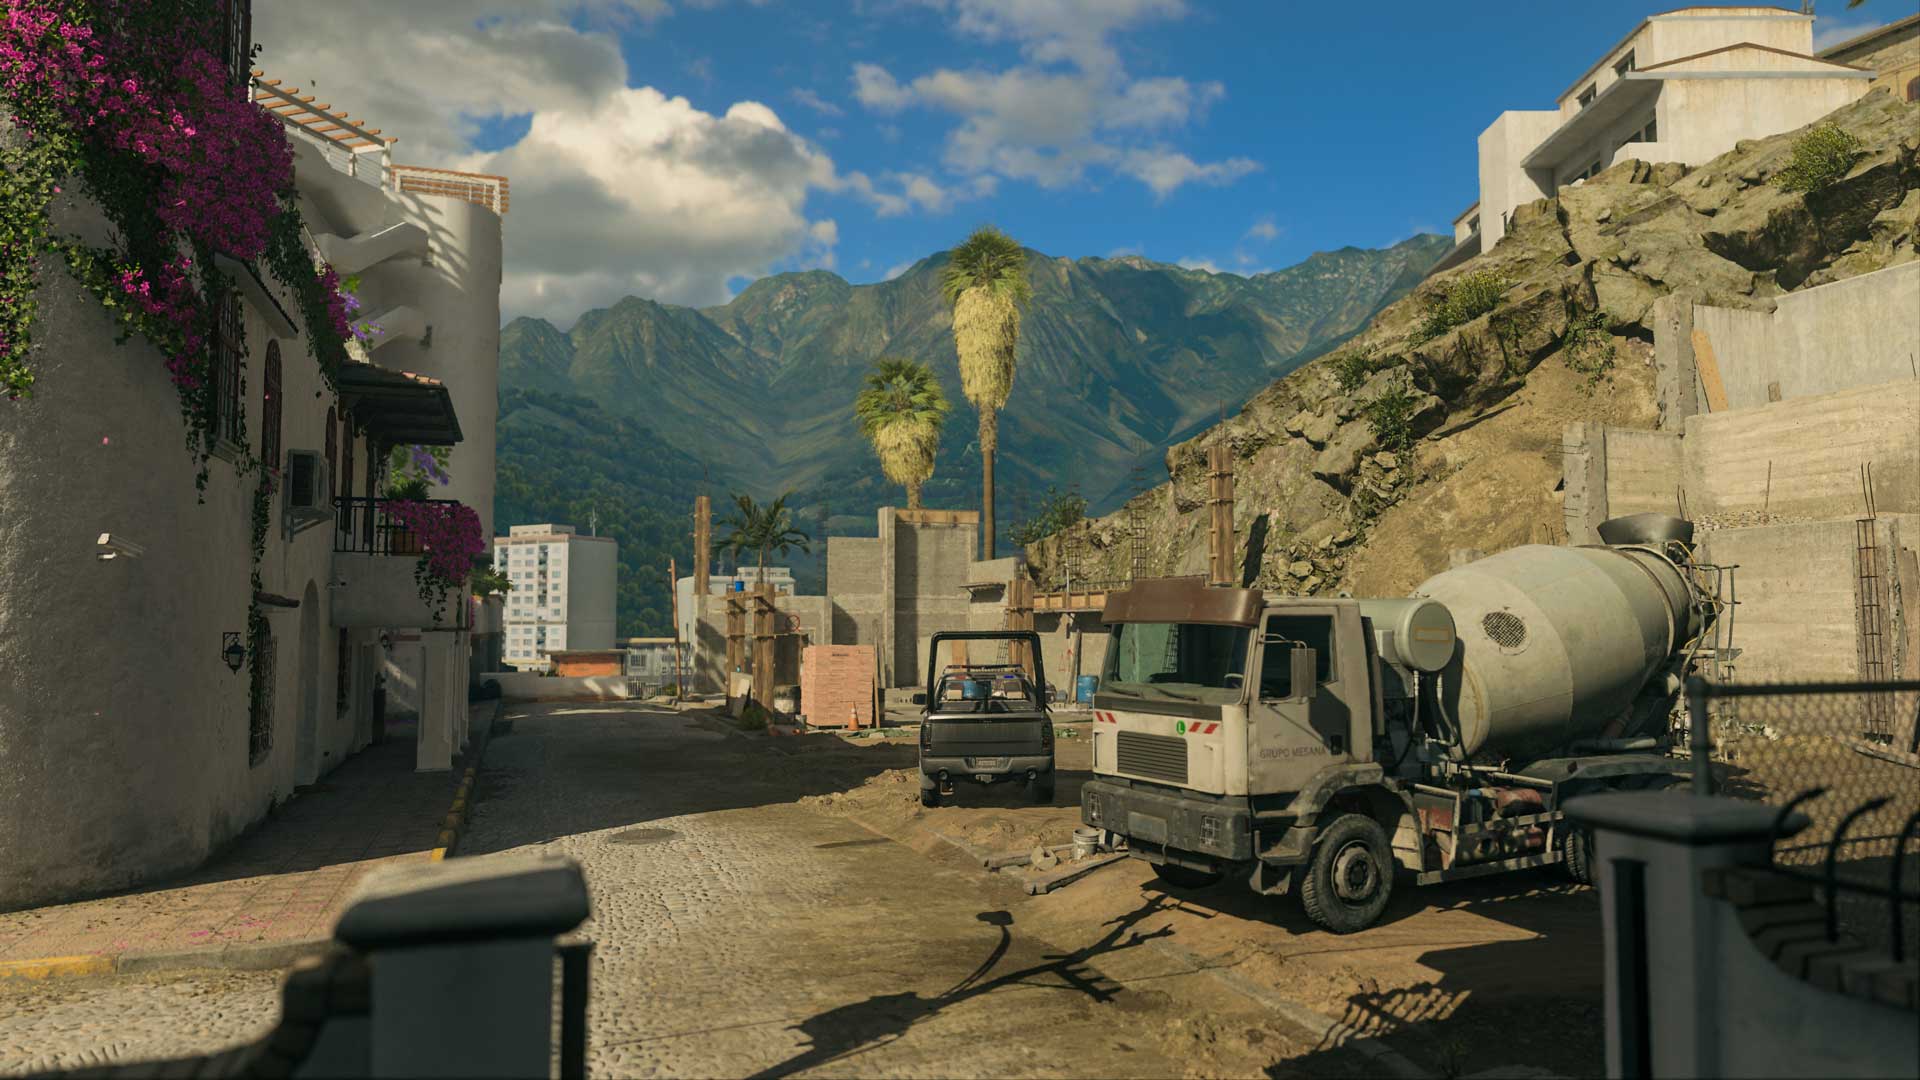
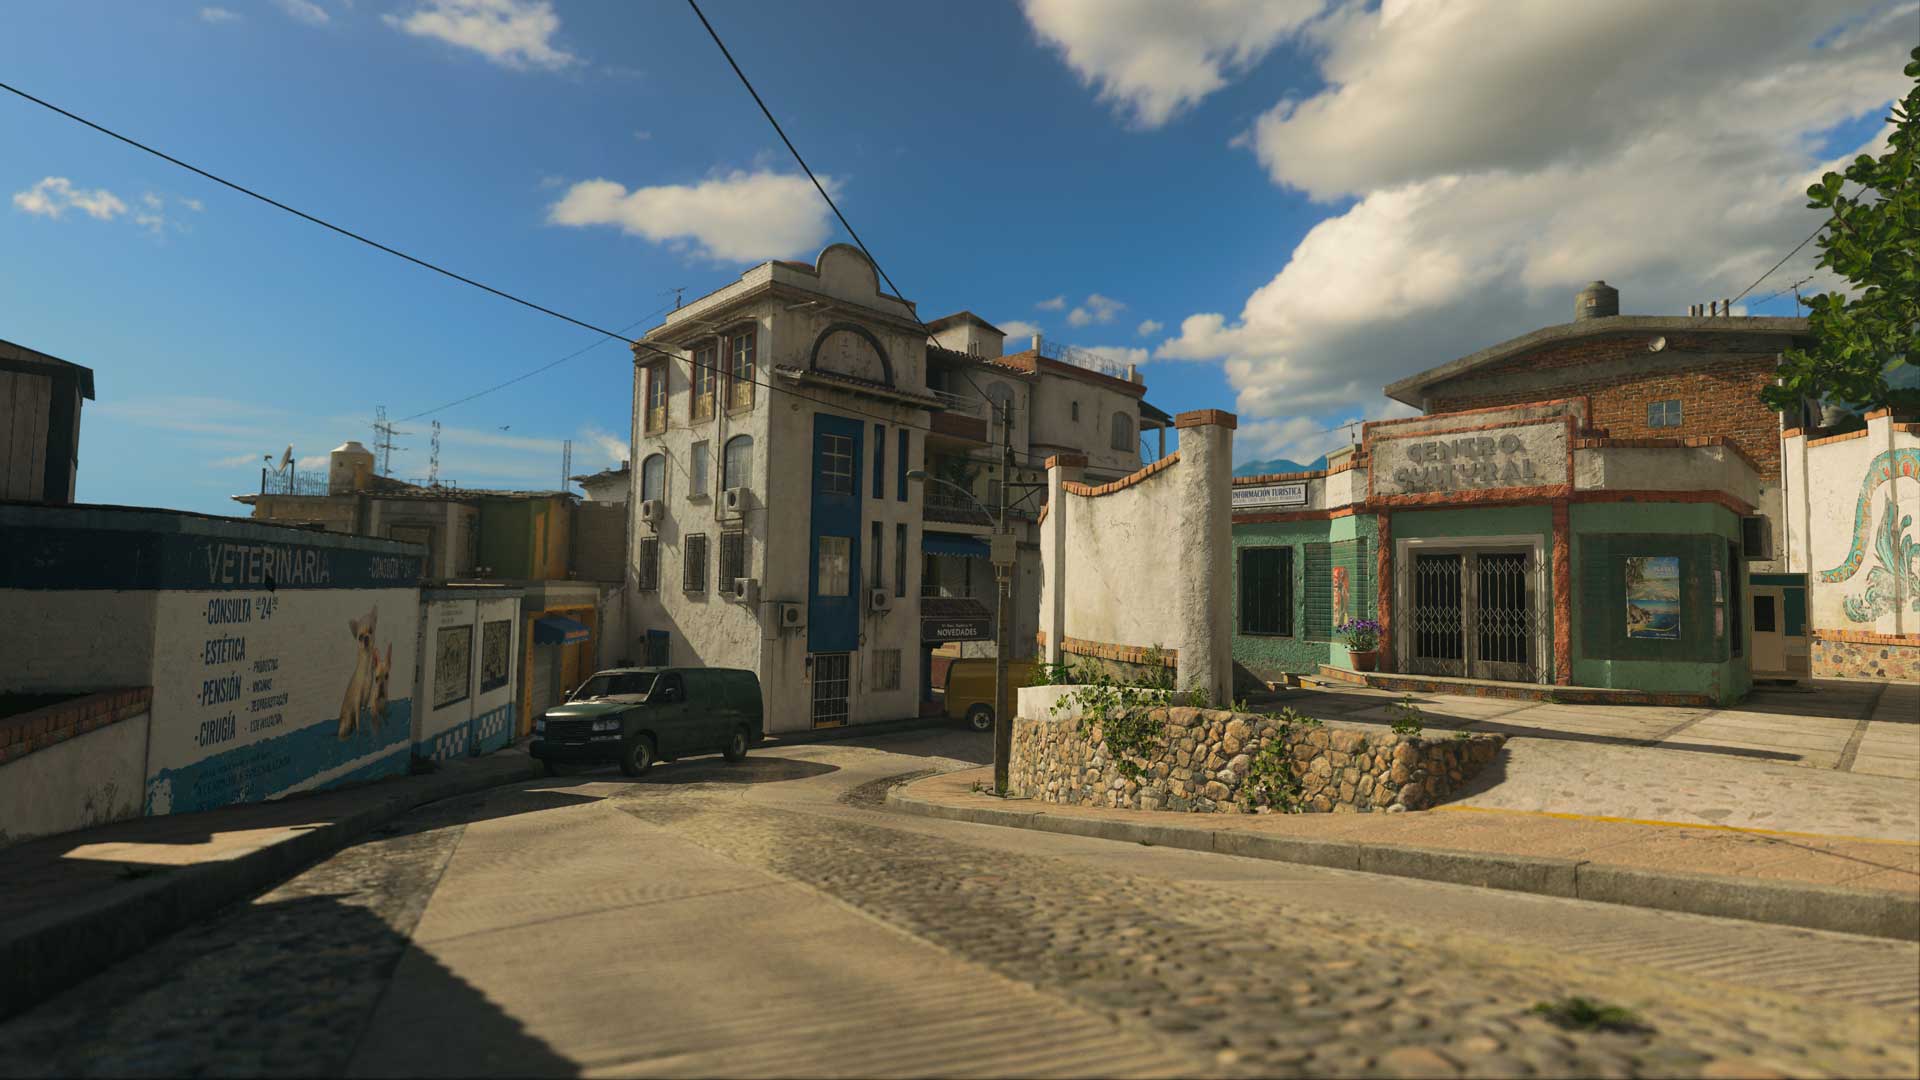
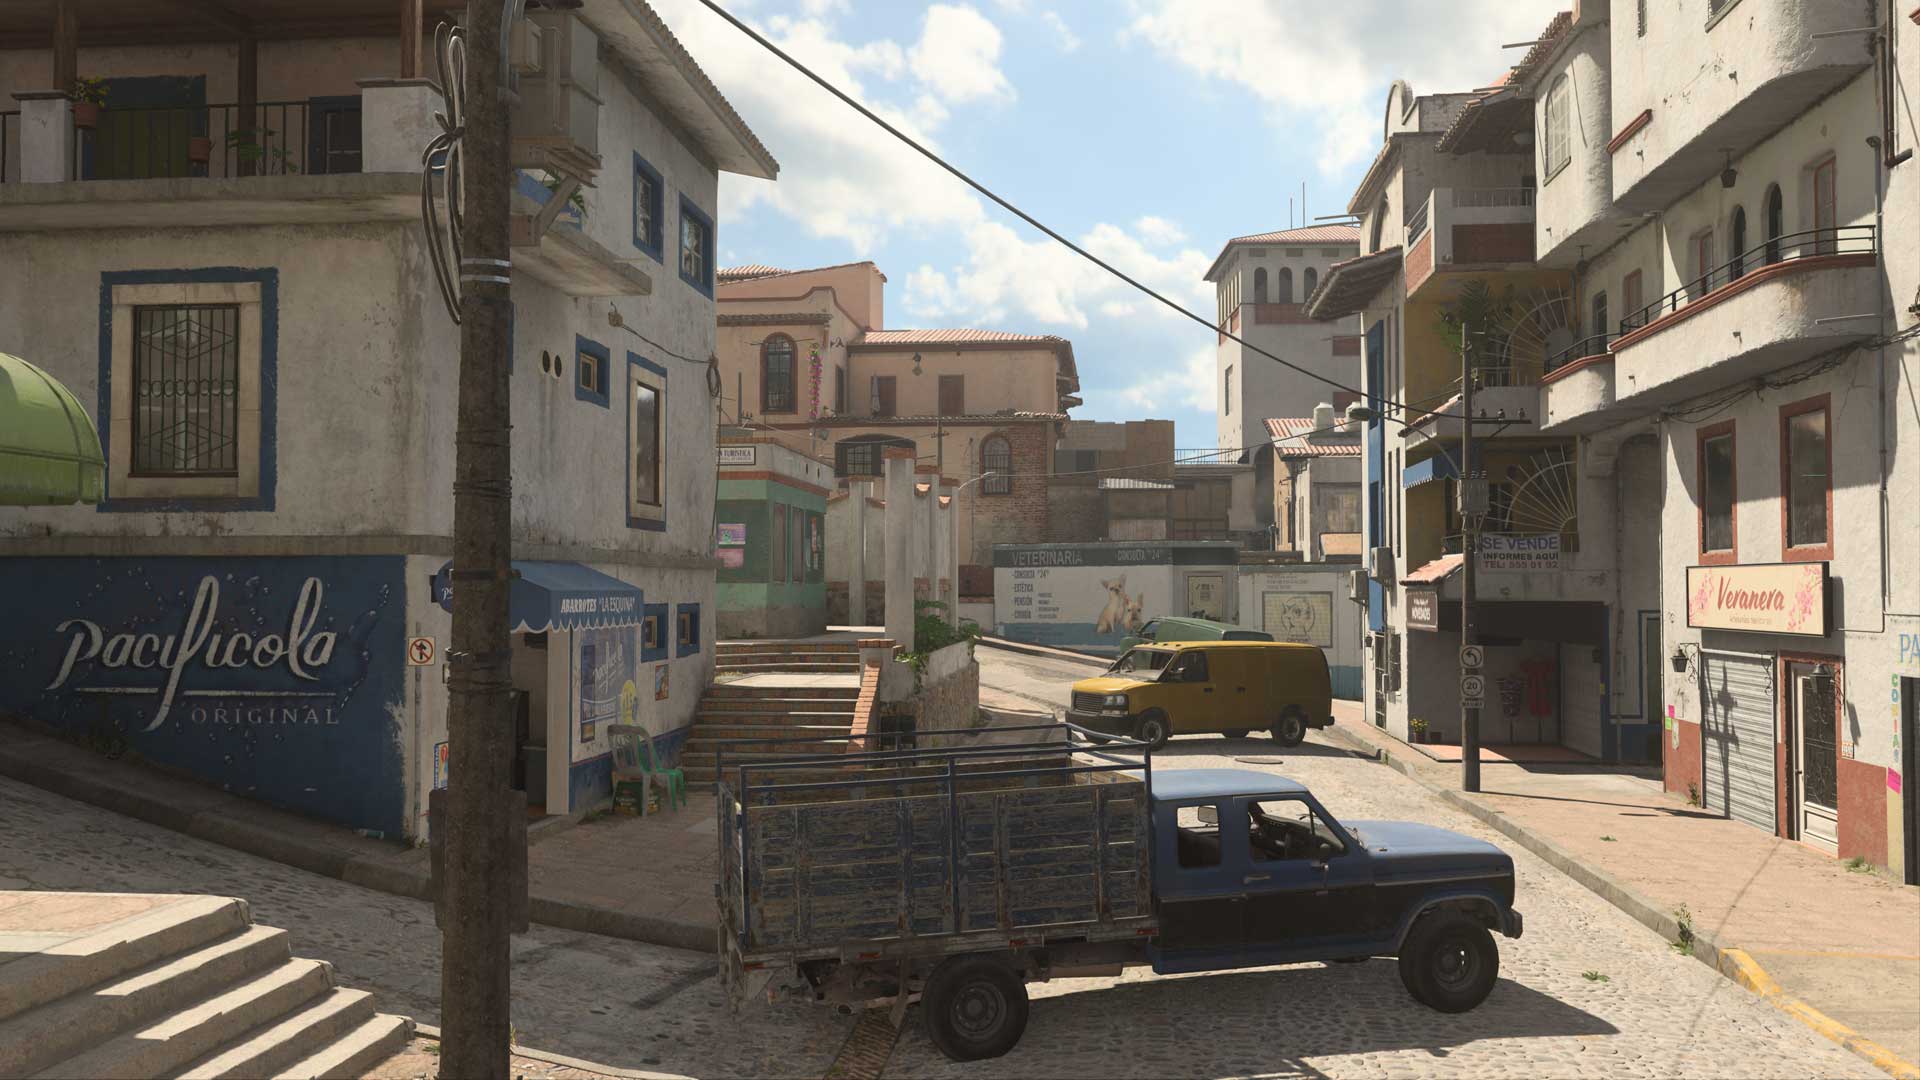
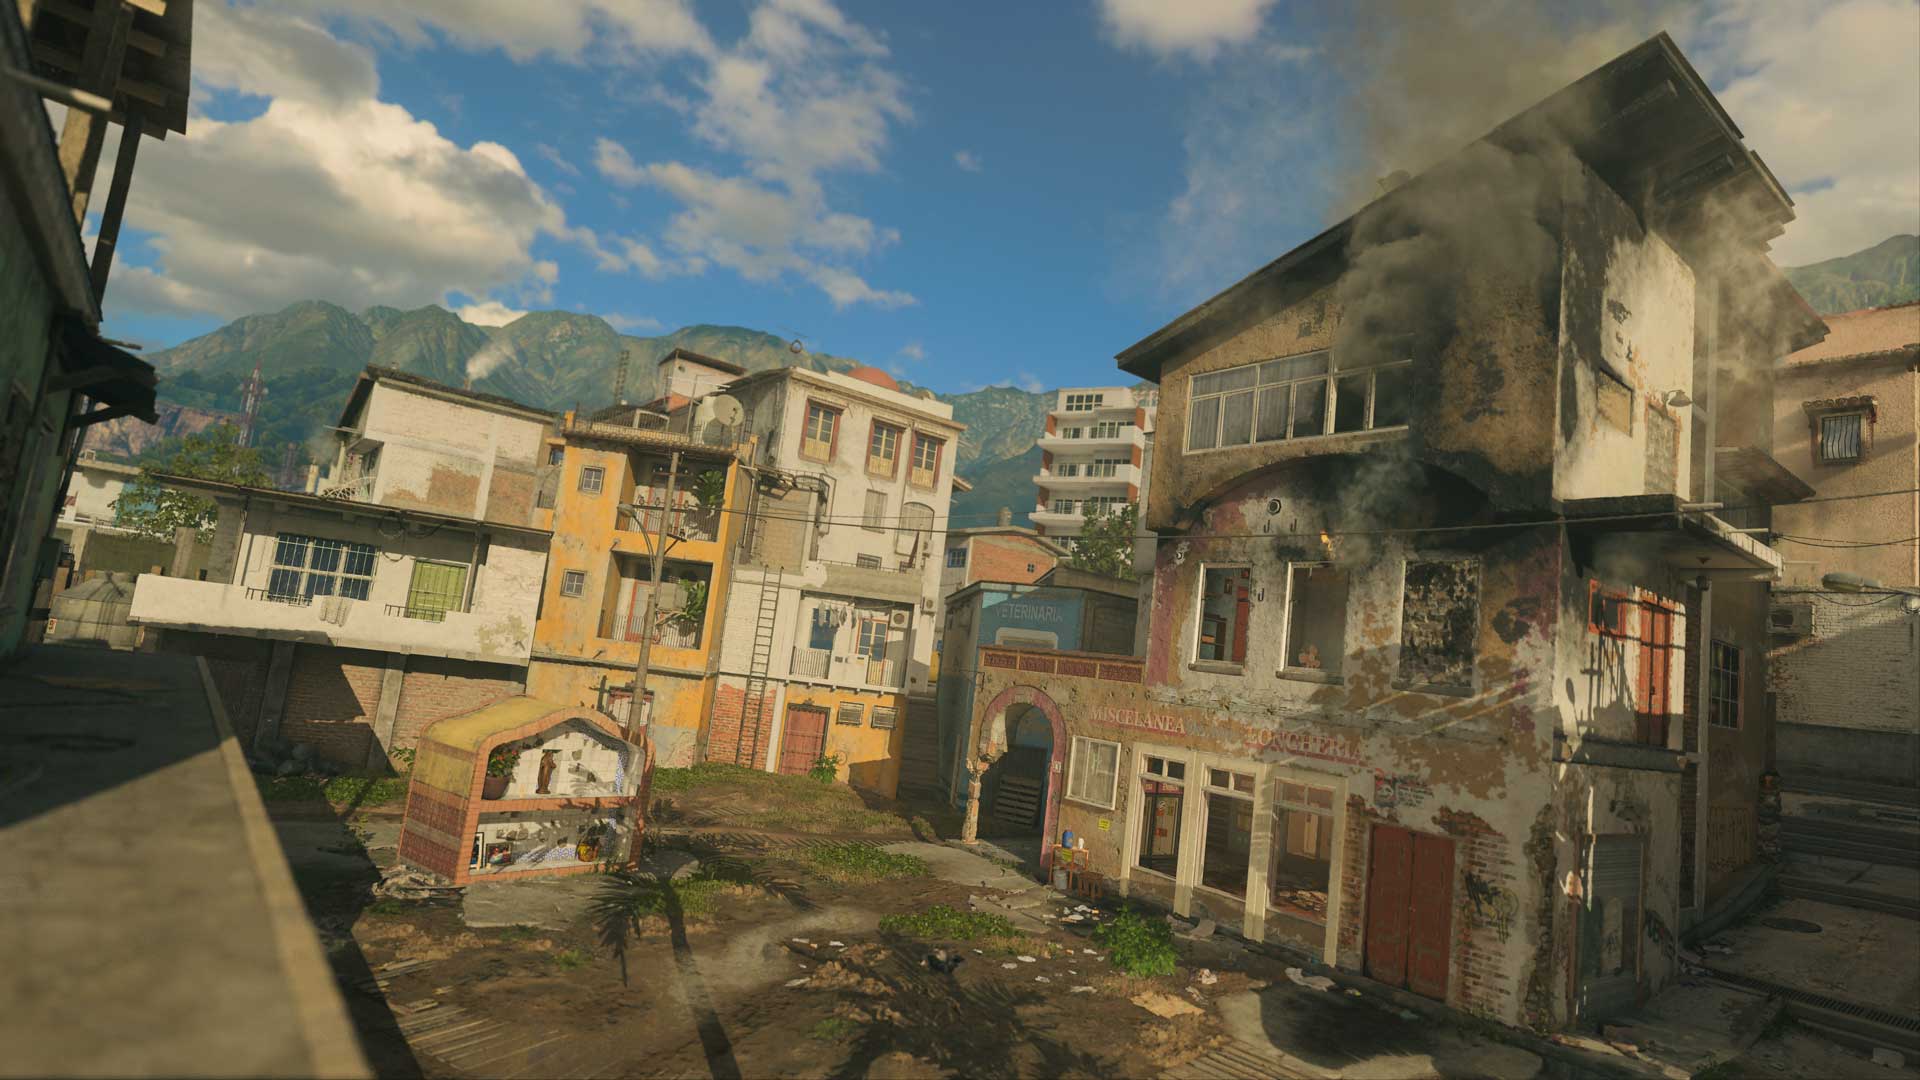
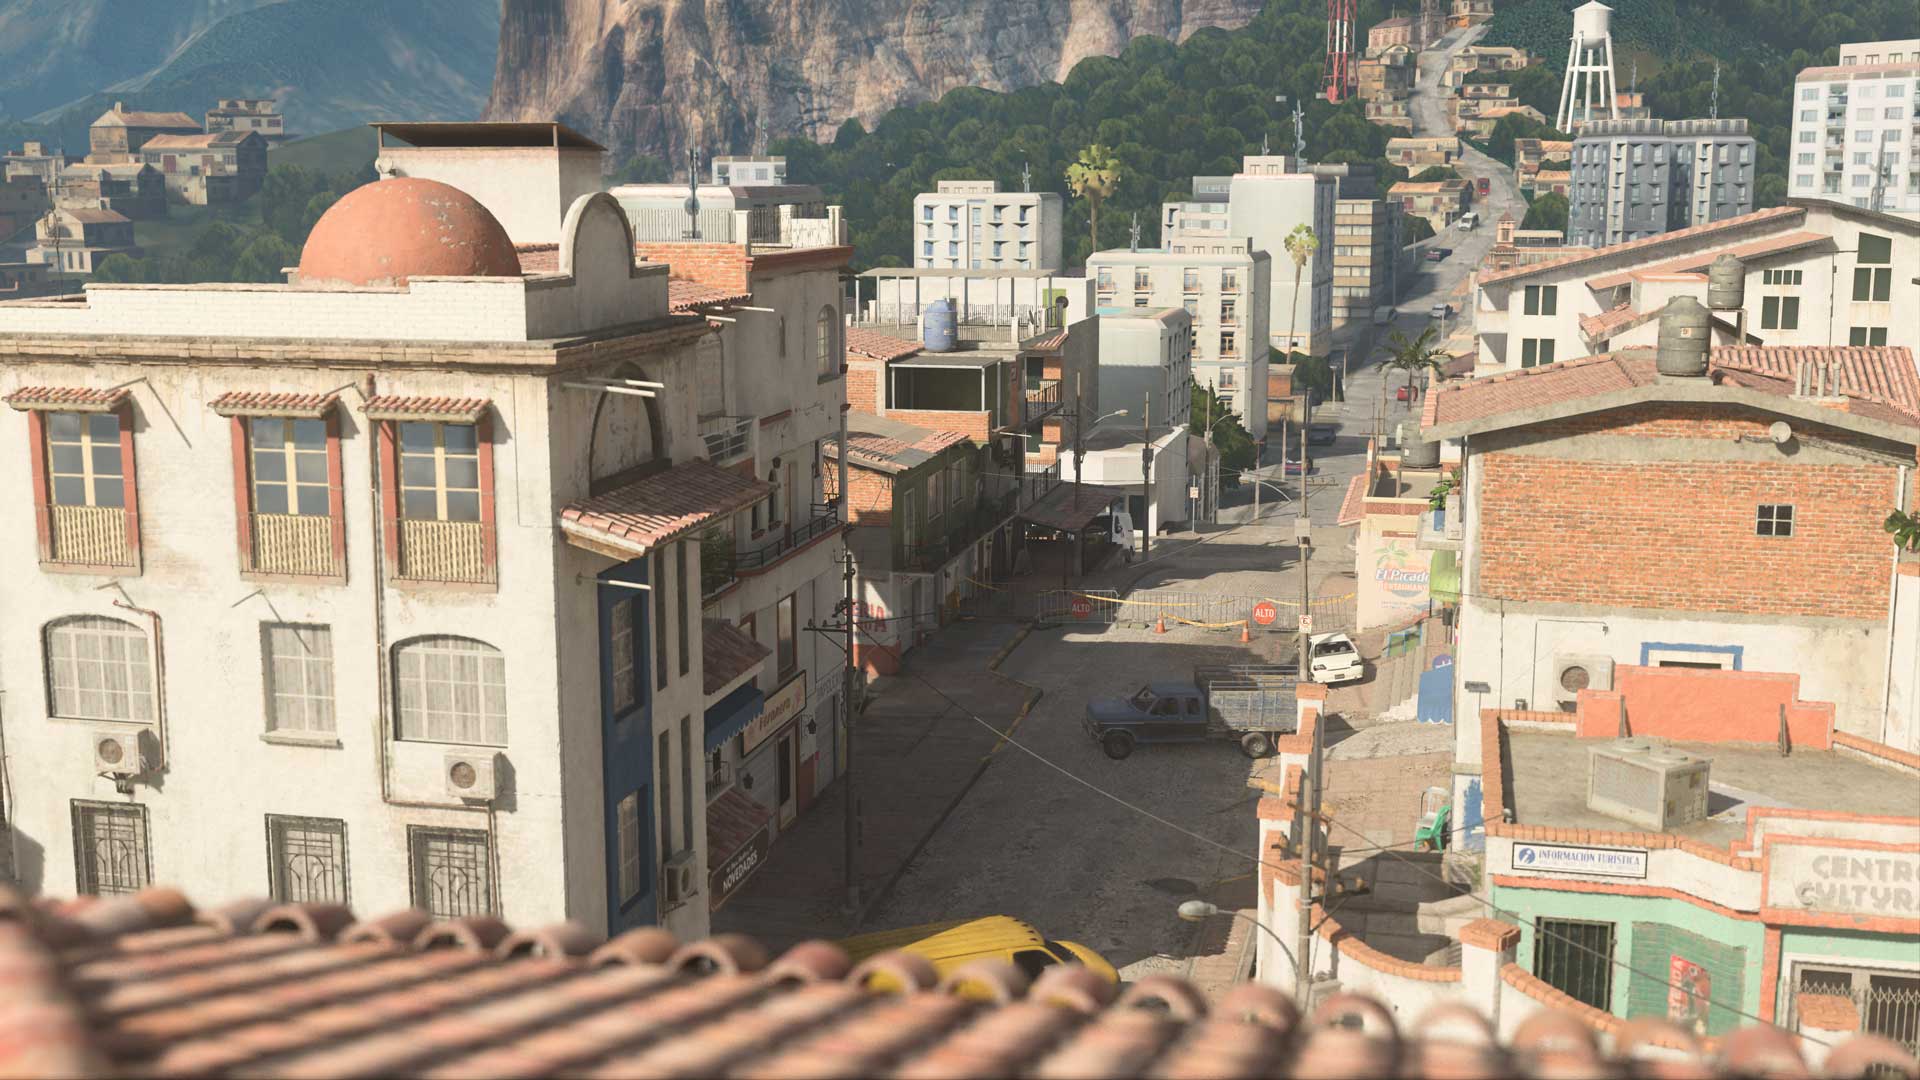
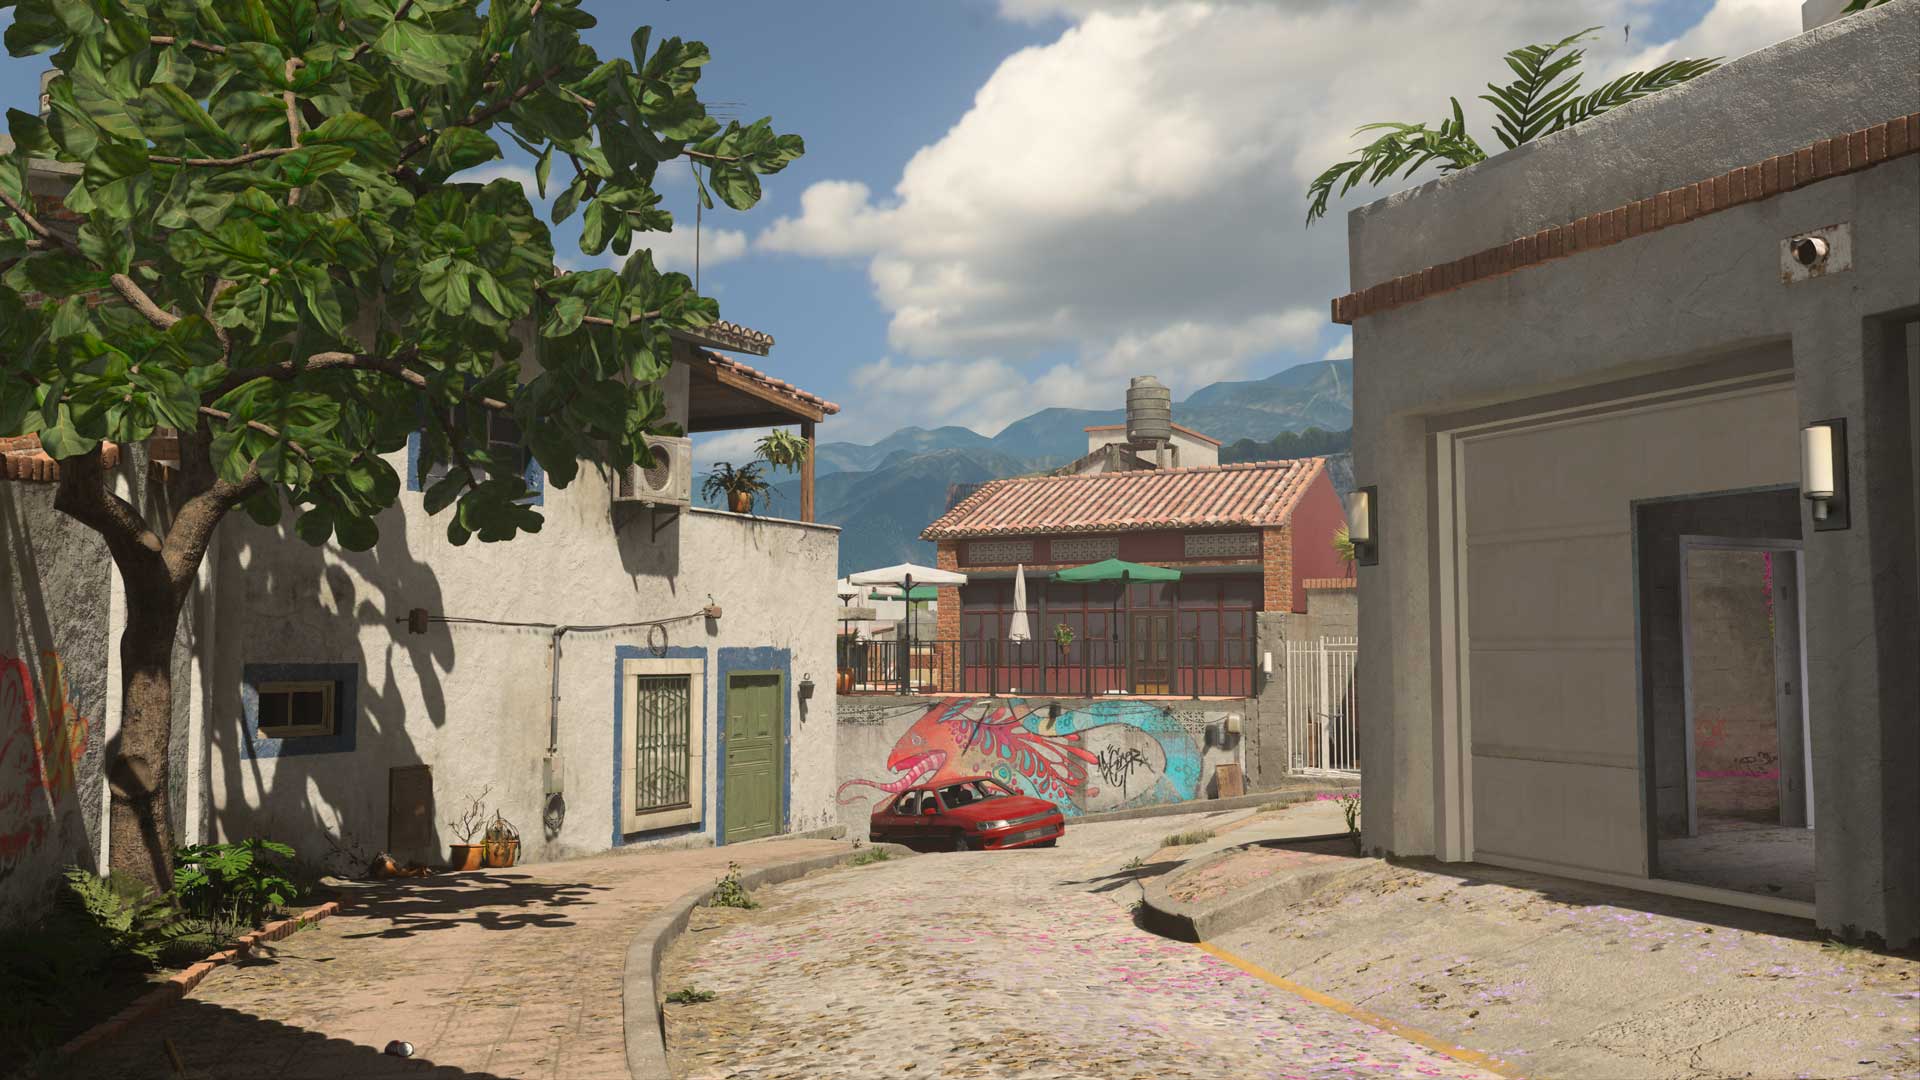
Punta Mar Las Almas Day 278,关键字1 15:42 Factions Deployed: SpecGru / KorTac A seaside tourist destination becomes the latest battleground for KorTac and SpecGru forces as Operators descend into Punta Mar ready to skirmish. In this small 6v6 Core Multiplayer map launching with Season 05 for Call of Duty®: Modern Warfare® II, teams will fight across the streets and over the rooftops of a tight arena with little time between engagements. Watch the shop windows for enemy Operators, use the side streets and alleyways to your advantage, and keep pressing for the win. Spawn Point: KorTac KorTac Spawn Zone (East) — Backlot It won’t take long for the fighting to begin on this small map, but KorTac forces still have a few options in the match’s opening seconds, namely whether they opt for sticking to ground level or climbing to the Rooftops. On the ground, take the middle path to get right into the thick of the battle on the main road, or head through the northern alley or southern Underpass for tighter, closer-quarters combat. There are several easily accessible ladders leading to the Rooftops of the nearby buildings for those looking to get above the action. Spawn Point: SpecGru SpecGru Spawn Zone (West) – Construction While the SpecGru starting spawn lacks the verticality available to KorTac, the Construction area is also closer to the main road compared to the Backlot. Head north to access the top of the road, with an even better view obtainable by climbing to the Shootout balcony via the dumpster on the building’s south side. Take the southern path toward the Intersection to avoid the main road, instead focusing on short- to midranged battles; watch for enemies firing from the second floor of Stores or rushing in from the Underpass. Map Maneuvers: Route Planning For the purposes of this guide, we’re breaking up Punta Mar into five main sections: Construction The open Construction area features stacked supplies and large vehicles for cover when passing through. Of particular interest are the stacked paving stones; hop onto the barrel beside them for a fortified view of all three entry points. Prepare to encounter enemies doing the same when breaching the area. A sticky grenade thrown just behind their position should convince them to move. Note the southern path leading in and out of Construction; the garage here makes for the perfect ambush point against passing enemies. Use it to cut down traffic in the area and look out for opponents inside when moving through. Center Including the tourist information center and the buildings around it, Center marks a natural hotbed of activity between the two major spawn points. Climb onto the tourist building for a commanding view over the main road, or fight for a spot on the upper levels of Stores, Shootout, and Hotel. On the ground, watch for enemies coming from the Underpass or firing from Groceries. With many available points of contact surrounding it, Center is likely to be in the thick of battle for much of the match. Intersection At the southern point of the map, Intersection finds Operators battling across storefronts. With Intersection being located about equidistant from the two main spawn points, there will be a lot of clashes here. Fights are bound to break out between Groceries and Stores, and anyone moving through the Intersection additionally becomes exposed to the Center. Move quickly and be ready to engage; in a pinch, the blue truck offers solid cover against attacks from the north. Rooftops Punta Mar features several ladders and other means of accessing the Rooftops of the eastern buildings, providing Operators with the ability to get high above the competition. From here, players can easily get a full view of the main road, though watch your six as enemies around the Backlot and Shrine can land shots from behind. Also be prepared to fight off intruders joining you here, so swap to your Handgun if your Primary Weapon struggles in close quarters. Shrine The Shrine and the Backlot behind it sit in a fairly open area, so be mindful when moving around here. The nearby Green Building and Fire both face the Shrine, with the upper level of Fire providing another access point to the Rooftops. When capturing objectives in this area, move into one of these two buildings afterward to defend the point; otherwise you’re a sitting duck to anyone on the Rooftops or coming through the narrow passage. Objective Routes and Rotations Mode Intel: Domination Flags can change hands fast on a small map like this, so stay focused on the objective and strive to lock down two flags and hold them. The A and C flags are both near the starting spawns, though these points may change throughout the match if the enemy team’s spawn flag is captured. The Intersection gains extra prominence here as the location for the B flag, so expect heavy bouts of fighting coming from all sides. Try holding down Groceries and Stores to either side of it to cut down on the incoming crossfire. When attacking the C flag in Construction, head in through Shootout to cut off overhead cover for the defenders and let them have it with an air-to-ground streak. On A, use the Shrine for cover against the Rooftops, then set up in Fire or the Green Building to defend it. You’ve likely picked up on a theme here: Grab the flag, then fan out to cover positions around it so you’re not an easy target sitting out in the open. Mode Intel: Search & Destroy While Search & Destroy tends to slow things down, you can still expect a lot of fast-paced rounds here as teams go for the elimination win. With the defenders starting in the Backlot, the attacking team should be ready for Operators to appear on the Rooftops, hoping to use their height advantage to get early eliminations. Consider hoofing it through the Hotel to meet them there or taking the south path toward the B bomb site behind the blue truck in Intersection. With the A bomb site located on the second floor of Fire, it’s a good bet that the attackers will often favor the B site, which isn’t as deep in the enemy starting spawn. The defending team may therefore want to push toward B for a strong early defense. Even if the attackers expect it, it can’t hurt to send your best sharpshooter(s) to the Rooftops, so long as they can fend off early counterattacks. Mode Intel: Hardpoint Prepare to explore every corner of the map with a total of eight Hardpoints, starting in the Center and then moving north to the Green Building in the Backlot. From there, head south to the first floor of Shootout, then northeast to the bottom of Stores, and then back west to the Hotel lobby. Return to the Intersection for the sixth Hardpoint in Groceries; then fight for control of both starting spawns, beginning with Construction and ending on the first floor of Fire. That’s a lot of Hardpoints to get through, but the map’s small size makes travel fast. With the ability to see large sections of the map at a time via the Rooftops, it’s possible to shut down enemies en route before they even get to the objective, so long as you can defend your position. Top Tips 1. Stay on the move. The danger of the main road combined with the proliferation of traversable buildings may encourage you to find an interior you like and stick to it, but you’ll be more successful if you move aggressively and keep to the front lines of the fight. 2. Battle for the Rooftops. The Rooftops over the eastern buildings are a highlight of the map. There’s sure to be many skirmishes for control over the sights they provide. Learn all the routes leading up here so you can get there fast and know where to look for incoming attacks. 3. Keep your feet on the ground. Even if you are the ruler of the Rooftops, there’s a time and place for everything. If your team needs you elsewhere, get down and fight on the ground. 4. Overclock your Field Upgrade. Field Upgrades like the Trophy System and Portable Radar are invaluable on a small map like Punta Mar, upping your defense against the constant stream of incoming enemies. Consider the Overclock Ultimate Perk to earn them even faster in addition to storing an extra use for times of great need. 5. Double the fun. With traversable buildings lining the main road, you’ll often move from exterior midrange engagements to interior close-quarters fighting. Consider equipping the Overkill Base Perk so you can switch to the best weapon possible in both scenarios. 6. Flash the Garage. When heading to or from Construction along the south path, don’t hesitate to throw a grenade — Flashbang, Stun, or any kind — into the Garage on your way. It’s better to throw it and discover nobody’s there than attempt to defend yourself when it’s too late. 7. Trap the narrow passage. The narrow passage leading to the main road from Shrine is the perfect spot to lay down a Proximity Mine or Claymore. There’s little room to move, so an inattentive Operator will surely cross its path. 8. Van to vet. On the main road and you need to get up to the Rooftops fast? Climb onto the van in front of the veterinary clinic and hop onto the building’s roof to get up high in a jiff. 9. Sights up. A little preparation can go a long way. Raise those sights when turning a corner toward the main road or toward any major new location. On a map this small, there’s a good chance there’ll be an enemy on the other side. 10. No easy retreat. As idyllic as the surroundings may appear, Operators aren’t here to relax. This is an intense, close-range map with little downtime between engagements. That’s not to say you won’t have fun; in fact, it’s a never-ending blast. Head in ready for the fight. Stay frosty. © 2023 Activision Publishing, Inc. ACTIVISION, CALL OF DUTY, and MODERN WARFARE are trademarks of Activision Publishing, Inc. All other trademarks and trade names are the property of their respective owners. For more information, please visit www.callofduty.comand www.youtube.com/callofduty, and follow @Activision and @CallofDuty on Twitter, Instagram, and Facebook. July 31, 2023 The Mission: Detailing the map, tactics, and tips for a 6v6 Multiplayer map set in the downtown area of an Al-Qatala-occupied city in Urzikstan. July 27, 2023 From a fresh twist of the knife in the Call of Duty: Modern Warfare story, to impressive free content drops across both Modern Warfare II and Call of Duty: Warzone, to celebrating the 50th anniversary of hip hop, get ready for Season 05. July 10, 2023 The Mission: Detailing the map, tactics, and tips for a 6v6 Multiplayer map inspired by the Floating District of southwestern Vondel. Check Out Job Opportunities At Our Studios Join Us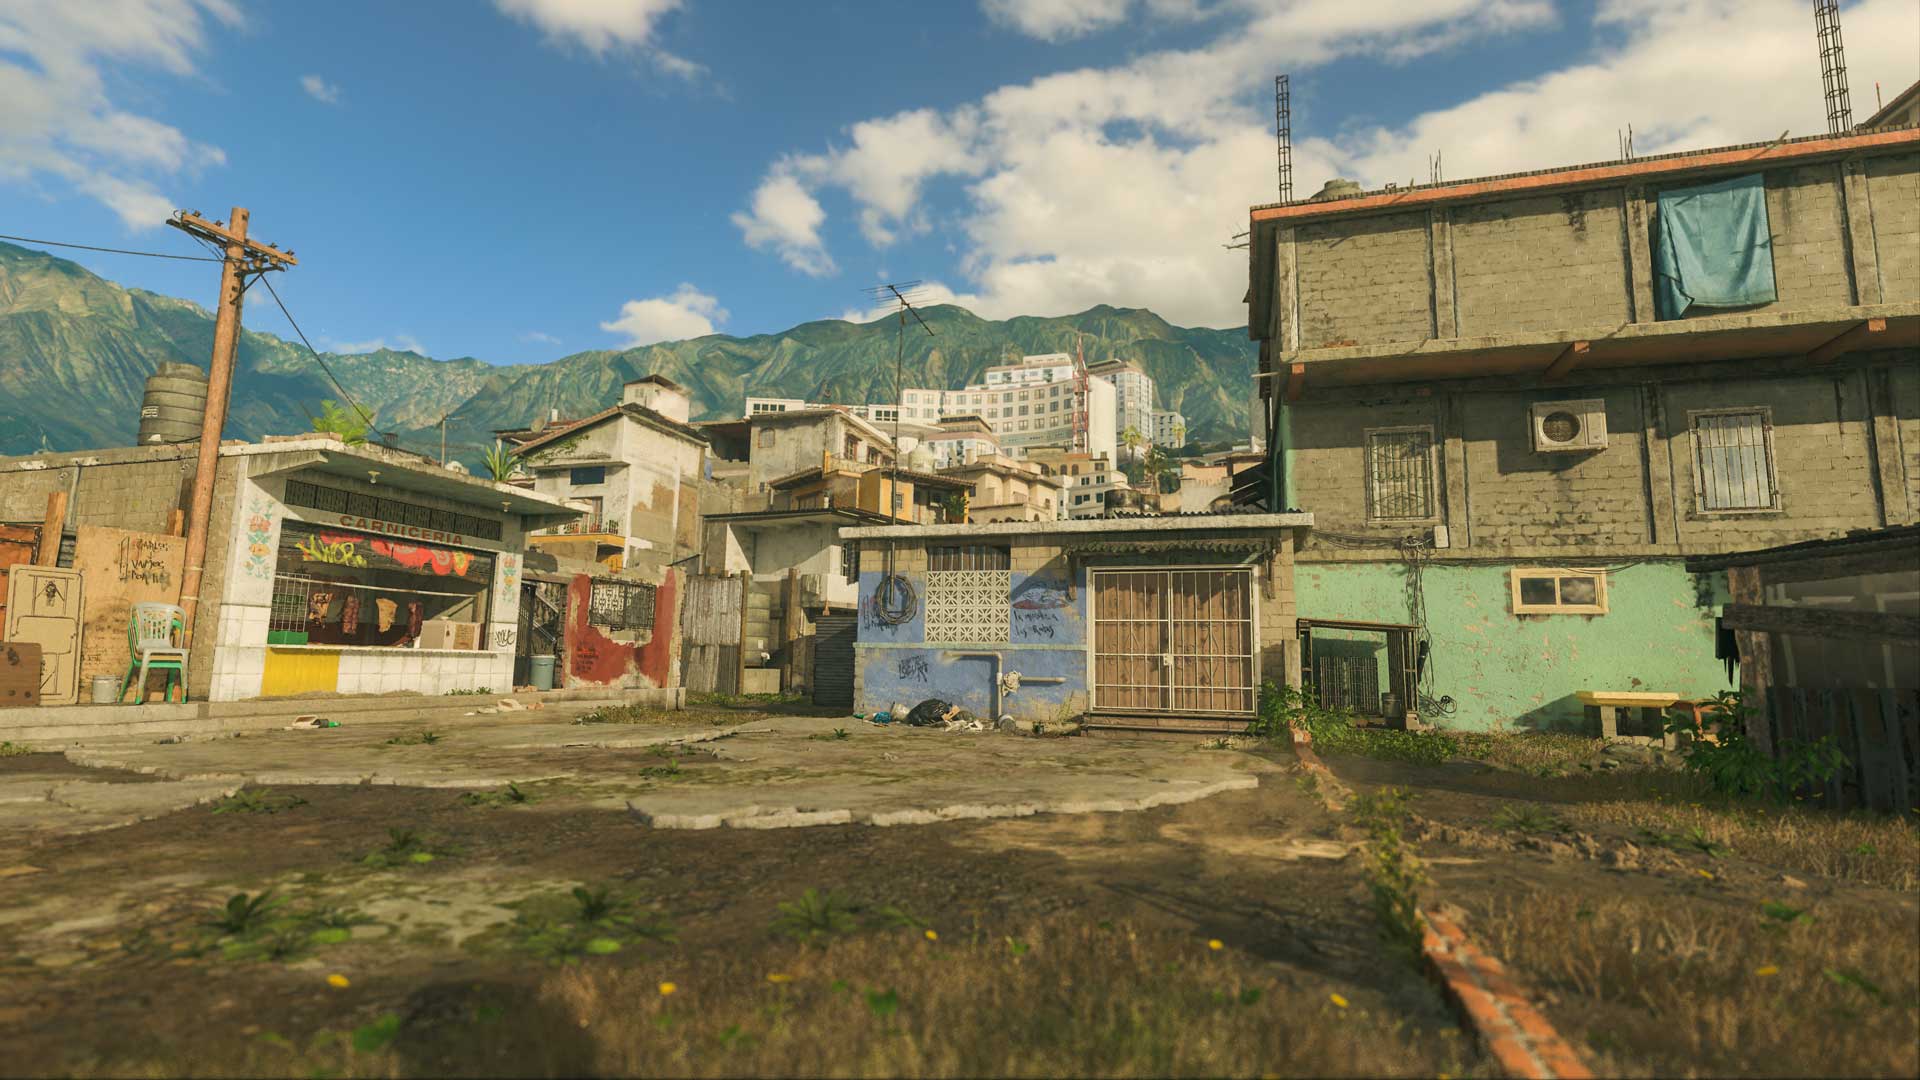


Call of Duty: Modern Warfare II Strike Map Intel
Modern Warfare II and Warzone Season 05: Content Drop
Call of Duty: Modern Warfare II Vondel Waterfront Map Intel
| COD Blog
View All Call of Duty Posts
| COD Blog
View All Call of Duty Posts
Next Post 
We're Hiring
Our Teams
- 最近发表
- 随机阅读
-
- Anarchy Reigns in Call of Duty: Mobile Season 5 — Get Wrecked!
- 第858章 他家先生来了
- 第887章 夫人我怕
- 第877章 谈笑间让池家万劫不复
- 三林镇杨东社区出现“移动便民小屋”,里面竟然有这些服务……
- 王钰栋新10号!国足末战23人名单:曹永竞朱辰杰伤缺
- 第850章 申思远忧思成疾
- ราคาทองคำครั้งที่ 3 ขึ้น 50 บาท รูปพรรณขายออก 52,100 บาท
- 辽宁省第十届三块石登山活动举行
- 再见快船!曝1.7亿巨星今夏7换1离队,有望联手哈登冲冠
- 第869章 逝去的人都藏在云里
- 四年级状物作文:奶奶家的一株苦瓜
- 意大利队考虑换帅 皮奥利、拉涅利、德罗西成候选
- Call of Duty: Black Ops 6 Season 04 Free Trial: Multiplayer and Zombies
- 第876章 纵是清欢也有滋味
- 第887章 夫人我怕
- 世预赛国足憾平叙利亚 要想出线必须同时满足3条件
- 身体出现这些症状,或是缺钙的表现,日常可常吃这5“物”补钙!
- Explainer: What is Chip Binning?
- “อ่าวมาหยา”คว้าแชมป์ชายหาดถ่ายภาพสวยที่สุดในโลก
- 搜索
-
- 友情链接
-